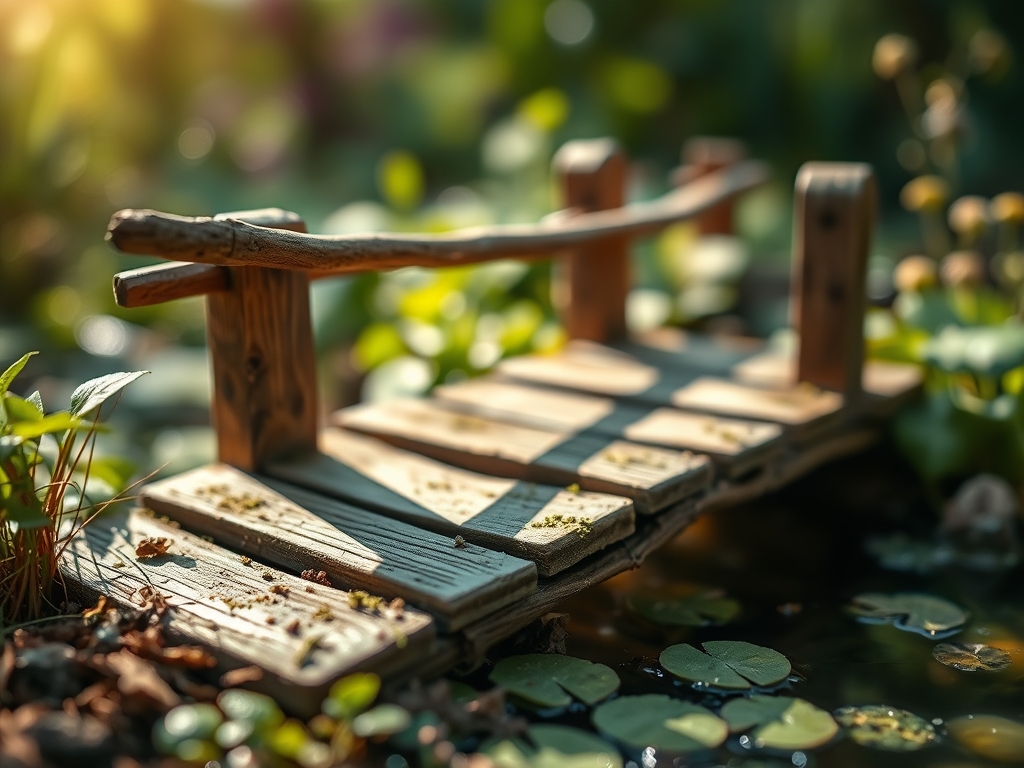
8 Unique Ways How to Build a Pond Bridge
Damp earth releases geosmin as the spade cuts through the rhizosphere; the scent signals a transition from aquatic management to structural engineering. Constructing a crossing over a water feature requires more than aesthetic intent. It demands an understanding of soil load-bearing capacity and the structural integrity of the banks. Learning how to build a pond bridge involves calculating the span to ensure the footings do not compress the root systems of surrounding marginal plants. Proper installation prevents soil compaction that would otherwise restrict oxygen to the roots; maintaining high turgor pressure in the surrounding flora is essential for bank stabilization. A bridge serves as a functional conduit that protects the delicate ecosystem of the pond edge from foot traffic. By elevating the path, you preserve the microbial activity within the soil and prevent the erosion of the pond liner. This guide focuses on the technical precision required to integrate timber, stone, and steel into a living landscape without disrupting the biological equilibrium of the water.
Materials:

The foundation of any bridge begins with the soil chemistry and physics of the bank. The ideal substrate for supporting bridge footings is a **friable loam** with a high **Cation Exchange Capacity (CEC)**, typically ranging between **15 and 25 meq/100g**. This ensures the soil has the structural density to hold anchors while maintaining enough porosity for drainage. Before construction, test the soil pH. A range of **6.0 to 7.0** is optimal for the health of stabilizing grasses and shrubs.
If the soil is overly sandy (low CEC), it will lack the cohesive strength to support heavy timber. If it is heavy clay, it may heave during freeze-thaw cycles. Amend the landing zones with organic matter to reach an NPK ratio of 5-10-5 in the surrounding planting beds. This specific ratio promotes root development (phosphorus) over excessive foliage (nitrogen), ensuring the plants around the bridge footings have the tensile strength to hold the earth in place. Use pressure-treated lumber rated for ground contact (UC4A or higher) or naturally rot-resistant species like Western Red Cedar. Hardware must be 316-grade stainless steel to resist corrosion in high-humidity environments.
Timing:
Successful bridge installation correlates with the hardiness zone and the biological clock of the local flora. In Hardiness Zones 4 through 7, construction should occur during the dormant season or late summer when water levels are at their lowest. Avoid the spring thaw when the soil is saturated; heavy machinery or even consistent foot traffic on wet soil causes irreversible compaction, destroying the pore space necessary for gas exchange in the rhizosphere.
Observe the "Biological Clock" of your marginal plants. The transition from the vegetative stage to the reproductive stage usually occurs after the summer solstice as the photoperiod shortens. Installing the bridge during the late summer allows you to prune back senescing foliage without interrupting the peak growth phase. Ensure all structural work is completed at least six weeks before the first hard frost to allow the soil around the footings to settle and for any transplanted stabilizers to establish root systems before the ground freezes.
Phases:

Sowing the Foundation
The first unique method involves the "Living Pier" approach. Instead of concrete, use gabion baskets filled with local stone and interplanted with Carex species. Excavate the landing sites to a depth of 18 inches. Level the base with 3 inches of compacted crushed stone.
Pro-Tip: Utilize the principle of mycorrhizal symbiosis. When backfilling around your bridge footings, inoculate the soil with mycorrhizal fungi. These fungi form a mutualistic relationship with plant roots, extending their reach for water and nutrients, which creates a biological net that reinforces the structural stability of the pond bank.
Transplanting and Anchoring
For a flat-span timber bridge, use 6×6 inch sills set back at least 2 feet from the water's edge. This prevents the weight from causing bank slumping. If you are building a "Moon Bridge" with a high arch, the lateral thrust is significant. You must anchor the ends into concrete deadmen buried 3 feet deep.
Pro-Tip: Respect phototropism when positioning handrails. If the bridge is high enough to shade the water, ensure the orientation allows sunlight to reach the pond surface for at least 6 hours a day. This maintains the photosynthetic rate of submerged oxygenators, preventing anaerobic conditions in the water column.
Establishing the Crossing
The third method utilizes recycled steel I-beams for a minimalist industrial look. Steel allows for a thinner profile, which reduces the "shadow footprint" on the pond. Once the structure is set, plant the margins with Iris pseudacorus or Juncus effusus.
Pro-Tip: Manage auxin suppression by pruning the terminal buds of plants near the bridge entrance. This encourages lateral branching, creating a dense "living wall" that hides the structural hardware and directs foot traffic precisely onto the bridge deck, protecting the surrounding soil from compaction.
The Clinic:
Physiological disorders in the landscape often manifest near new construction due to soil disturbance.
- Symptom: Interveinal chlorosis (yellowing leaves with green veins) in marginal plants.
Solution: This is often a sign of iron deficiency caused by a pH spike if concrete runoff enters the soil. Fix this by applying chelated iron and acidifying the soil with elemental sulfur to return the pH to 6.5.
- Symptom: Leaf wilting despite moist soil.
Solution: This indicates root suffocation or "wet feet." The bridge footings may be redirecting surface runoff into a localized depression. Install a French drain using 4-inch perforated pipe to divert excess water away from the bridge landing.
- Symptom: Nitrogen chlorosis (uniform paling of older leaves).
Solution: The decomposition of organic mulch used during construction can temporarily tie up nitrogen. Apply a quick-release high-nitrogen fertilizer (20-0-0) at a rate of 0.5 lbs per 100 square feet to restore vigor.
Maintenance:
A pond bridge requires precise maintenance to ensure longevity and ecosystem health. Inspect the structural fasteners annually using a socket wrench to ensure the wood hasn't shrunk and loosened the joints. Use a soil moisture meter at the bridge footings weekly; the soil should maintain a consistent moisture level of 25-30%. If the level drops, apply 1.5 inches of water per week at the drip line of the surrounding plants.
Keep a hori-hori knife sharpened for removing invasive weeds that thrive in the disturbed soil around the bridge. Use bypass pruners to maintain a 12-inch clearance between foliage and the bridge deck to prevent trapped moisture from causing fungal rot in the timber. If the bridge is made of cedar, do not seal it with chemicals that could leach into the water; allow it to weather naturally to a silver-gray.
The Yield:
While a bridge is a structural yield, the "harvest" here is the accessibility to aquatic crops like Watercress (Nasturtium officinale) or Lotus (Nelumbo nucifera). Harvest Watercress when the stems reach 6 inches in length. Use sterilized snips to cut the top 3 inches. To maintain "day-one" freshness, immediately submerge the stems in 40-degree Fahrenheit water. This preserves turgor pressure and prevents the rapid senescence of the delicate leaves, ensuring they remain crisp for culinary use.
FAQ:
How deep should bridge footings be?
Footings should reach below the local frost line, typically 24 to 36 inches. This prevents frost heave from displacing the structure. In sandy soils, increase depth by 20 percent to account for lower soil cohesion and potential shifting.
What wood is best for a pond bridge?
Western Red Cedar and Black Locust are superior for their natural rot resistance. If using pressure-treated lumber, ensure it is rated for Ground Contact (UC4A). Avoid woods treated with creosote, which can leach toxins into the aquatic rhizosphere.
How do I prevent the bridge from being slippery?
Apply a clear anti-slip abrasive strip or score the wood perpendicular to the grain. Maintaining a 12-inch air gap between the water and the bridge deck reduces algae growth by increasing airflow and reducing localized humidity on the timber.
Can I build a bridge without concrete?
Yes, using the gabion basket method or large ballast stones. These "floating" foundations allow for natural soil expansion and contraction. Ensure the stone base is at least 12 inches thick and compacted to prevent settling over time.